

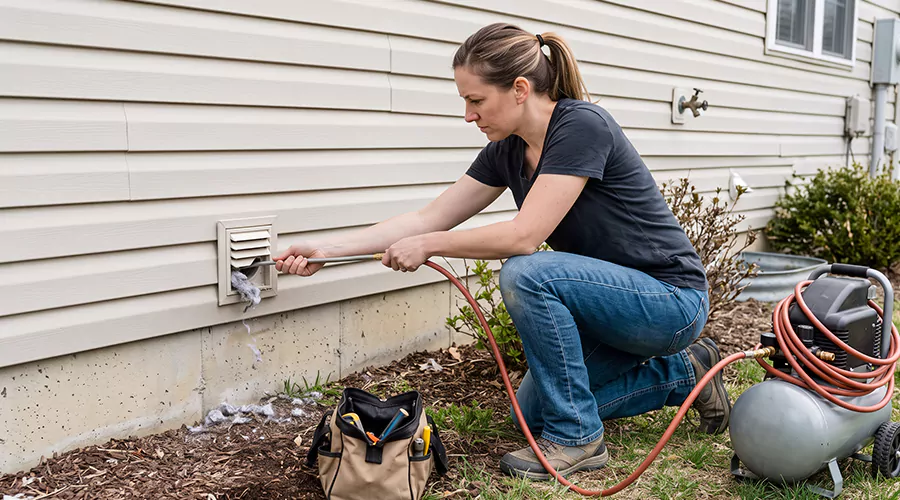
Cleaning a dryer vent with compressed air involves using a dryer-duct-rated pneumatic tool to loosen accumulated lint and direct it toward a controlled collection point. Professional cleaners may use an air whip or a directional nozzle designed for this purpose. However, blowing compressed air from a general-purpose compressor into an unknown or blocked dryer duct is not a recommended household cleaning method.
A clothes dryer exhaust system carries warm, moisture-laden air from the appliance to an outdoor termination. Fine fabric fibers can pass through the lint filter and collect inside the exhaust passage. Over time, buildup may restrict airflow and cause clothes to require longer drying cycles.
Compressed air can help loosen debris from some difficult-to-reach sections, particularly when suitable professional equipment is used. The method works differently from a rotating brush because the air-driven tool agitates lint through controlled jets. However, it does not automatically collect the loosened material, and excessive or misdirected airflow can damage duct connections. Eco-safe dryer vent cleaning can help address lint buildup while prioritizing appropriate cleaning methods and responsible debris removal.
Proper cleaning therefore involves more than attaching an air hose to the dryer outlet. The duct condition must be assessed and debris must have a safe route out of the system. Understanding these requirements helps homeowners decide whether compressed-air cleaning is appropriate for their vent.
How Does Compressed Air Dryer Vent Cleaning Work?
Compressed-air dryer vent cleaning uses pressurized air delivered through a specialized hose or nozzle. The moving air can disturb lint deposits that have accumulated along the inner duct surface. Depending on the tool design, the loosened material may be directed toward a vacuum collection point or the outdoor termination.
Unlike mechanical brushing, which uses physical contact to loosen lint, a pneumatic tool relies on airflow and movement generated by the nozzle. Some attachments are designed to move through a duct while releasing directed air jets. Others use flexible whipping action to disturb deposits along the passage.
The effectiveness depends on the actual duct conditions. Loose lint may respond to pneumatic agitation, while compressed nesting material or a collapsed duct may require a different approach. Compressed air cannot repair a damaged joint or restore the shape of a crushed exhaust passage.
Air Whips
An air whip is a pneumatic cleaning attachment that uses compressed air to create controlled movement inside a duct. Flexible elements can move against surrounding surfaces and help loosen accumulated material. The tool is normally connected to a compressor and operated according to its equipment specifications.
Air whips are used in several duct-cleaning applications, but an attachment must be suitable for dryer exhaust before it is selected. Tool size and agitation force matter because dryer ducts are smaller than many HVAC supply ducts. An unsuitable tool can damage a joint or thin duct material.
Directional Air Nozzles
Directional nozzles discharge air through openings arranged to produce a particular airflow pattern. Some are designed to direct debris toward the operator's collection point, while others move material toward the outlet. The intended direction depends on the nozzle and cleaning setup.
Directional control is important because moving debris farther into an obstructed passage can worsen the blockage. A nozzle should not be inserted without confirming where the lint is expected to travel. The cleaning plan must also account for the outdoor damper and any bends.
Vacuum Collection Equipment
Professional cleaners may pair pneumatic tools with vacuum equipment to collect dislodged lint. This reduces the amount of material released into the laundry room or other occupied areas. The collection method must be suitable for the tool and the amount of debris expected.
A household vacuum alone may not provide the same control as specialized cleaning equipment. It is also not safe to improvise an airtight connection that allows excessive pressure to build inside the duct. The system should have an appropriate flow path throughout the cleaning process.
Is Compressed Air Safe for Dryer Vent Cleaning?
Compressed air can be used in suitable professional cleaning systems, but it presents risks when applied without the correct equipment. Pressurized hoses can whip or separate if connections fail. Airborne lint and debris can also cause eye or respiratory exposure when they are released without adequate control.
The dryer exhaust itself may contain weak joints that cannot tolerate aggressive pneumatic cleaning. A disconnected or heavily obstructed passage can direct air and lint into building cavities rather than out through the exterior vent. This may leave combustible material concealed inside walls or ceilings.
Compressed air should never be directed toward a person or used to clean lint from clothing or skin. OSHA's general workplace rules place restrictions on compressed air used for cleaning and require appropriate protection against flying particles. These rules should not be interpreted as a universal compressor setting for every specialized pneumatic duct-cleaning tool, which must be operated under its own approved instructions.
For homeowners, a dryer-specific brush and vacuum are generally more practical for a short accessible duct. A professional pneumatic setup becomes more relevant when the exhaust route is complicated or requires equipment beyond ordinary household cleaning.
What Equipment Is Needed for Compressed Air Dryer Vent Cleaning?
A professional compressed-air cleaning setup includes more than an air compressor. The operator needs a compatible pneumatic attachment and a way to control the loosened debris. The condition of the duct and the tool manufacturer's requirements determine the exact equipment.
| Equipment | Purpose | Important Consideration |
|---|---|---|
| Suitable air compressor | Supplies air to pneumatic attachment | Must match tool requirements |
| Dryer-duct-rated air whip or nozzle | Loosens accumulated lint | Must suit duct material and diameter |
| Regulator and pressure gauge | Controls equipment air supply | Follow tool specifications |
| Rated air hose and secure fittings | Connects compressor to tool | Prevent accidental disconnection |
| Suitable lint collection equipment | Captures loosened debris | Avoid uncontrolled indoor release |
| Inspection camera | Checks concealed duct condition | Helps identify restrictions and damage |
| Eye and other task-appropriate protection | Reduces exposure during cleaning | Protect against flying particles |
| Airflow measurement equipment | Evaluates exhaust performance | Useful before and after cleaning |
The operator should not select pressure settings based on a generic online recommendation. Different pneumatic attachments require different operating conditions, and exceeding their ratings can create hazards. Tool and compressor compatibility must be confirmed before use.
An inspection camera can also be valuable when the vent has a history of recurring blockages. It may reveal a damaged elbow or separated joint that should be repaired before any pneumatic cleaning is attempted.
How to Clean a Dryer Vent With Compressed Air Step by Step?
Compressed-air dryer vent cleaning is best performed by a trained technician using equipment rated for dryer exhaust. The following process explains the stages of a suitable professional cleaning rather than recommending that homeowners inject high-pressure air directly into the duct.
Step 1. Inspect the Dryer and Exhaust Route
The cleaner first identifies the appliance and determines how its exhaust reaches the outdoors. The duct may travel through an exterior wall or run vertically toward a roof termination. The number of bends and accessibility of the passage influence which equipment can be used safely.
The technician should identify visible restrictions or damaged connections before inserting any pneumatic attachment. A loose joint may allow lint to escape into a wall cavity when air pressure is introduced. Structural defects should be repaired before proceeding with a method that could worsen them.
Step 2. Identify the Duct Material
The permanent exhaust passage should be constructed from materials approved for dryer use. Smooth metal ducts are common in residential installations, while listed metal transition ducts connect the appliance to the permanent passage. The cleaner should distinguish these components before selecting a tool.
Thin flexible materials may be damaged by aggressive pneumatic agitation. Plastic or unsuitable foil-style hoses should not be treated as ordinary permanent dryer exhaust ducts. When the material is damaged or unapproved, replacement is generally more appropriate than repeated cleaning.
Step 3. Shut Down and Isolate the Appliance
The dryer must be switched off and disconnected from electrical power before accessing the exhaust. The system should not operate while cleaning tools are inserted into the duct. This prevents accidental movement of the appliance's internal blower during the procedure.
Gas dryers require additional precautions because the appliance may have to be moved to reach the connection. A qualified technician should handle any necessary gas-line disconnection and restoration. The fuel connection must remain safe before the appliance is returned to service.
Step 4. Establish an Accessible Cleaning Point
The cleaner identifies an appropriate opening for the pneumatic tool and the debris collection equipment. The arrangement depends on whether the cleaning is performed from the appliance side or another approved access point. The exterior termination should also be identified.
A major requirement is preventing uncontrolled pressure or debris buildup inside the duct. The nozzle should not be inserted into a sealed passage with an unknown obstruction. The equipment arrangement must provide a suitable route for air and loosened lint.
Step 5. Remove Loose Lint Near the Opening
Before pneumatic agitation begins, accessible lint can be collected with a suitable vacuum. This prevents loose material near the entrance from being driven farther into the duct. A preliminary visual check may also identify damaged metal or a heavy obstruction.
Removing accessible deposits first gives the operator a clearer starting point. The pneumatic attachment can then be selected based on the remaining condition of the passage. An unusual blockage should be evaluated rather than treated with increasing air pressure.
Step 6. Set Up the Rated Pneumatic Equipment
The compressor and air hose are connected to the approved cleaning attachment according to its manufacturer's instructions. The operator checks fittings and the required operating conditions before introducing the tool into the duct. Pressure and airflow settings must remain within equipment ratings.
There is no single appropriate pressure for every dryer vent cleaning attachment. A pneumatic tool designed for a professional system should not be operated using arbitrary settings from a household air gun. Secure connections and controlled operation are necessary to avoid hose and nozzle hazards.
Step 7. Loosen Lint in Controlled Sections
The technician advances the pneumatic attachment through suitable portions of the duct using the method specified for the tool. Airflow loosens lint from surfaces while the collection setup manages the released material. Progress is controlled so the nozzle does not strike or separate fragile fittings.
The operator should stop when unexpected resistance suggests a collapsed section or heavy obstruction. More air pressure is not an appropriate substitute for identifying the problem. Damaged duct material may require mechanical repair before cleaning can continue.
Step 8. Collect Dislodged Lint
As lint is loosened, it must be directed toward the planned collection point. Professional vacuum equipment may capture material that would otherwise disperse into the building. If the method discharges debris outdoors, the area must be controlled so particles do not enter windows or neighboring spaces.
Simply blowing lint out of sight does not confirm that it has left the exhaust system. Debris can remain around elbows or become trapped near the termination. Collection and inspection are needed to determine whether the passage is actually clear.
Step 9. Inspect the Outdoor Termination
The exterior vent should be checked for lint and proper damper movement. A flap blocked by debris can prevent normal discharge even when much of the duct has been cleaned. The termination should remain free of mesh screens that catch lint.
Roof terminations require suitable fall-protection and access procedures. If the upper vent cannot be inspected safely, professional service should include an appropriate access plan. Cleaning the duct without checking the outlet may leave the final restriction unresolved.
Step 10. Verify the Exhaust Passage
The technician evaluates the duct for remaining lint or structural damage after cleaning. Camera inspection may be useful for concealed bends and locations where the cleaning tool encountered resistance. Any loose or damaged connections should be addressed before the appliance is reconnected.
Verification is important because compressed air may loosen particles without collecting all of them. A visible burst of lint at the outlet does not establish that the entire passage is clean. The condition of the duct should support normal unrestricted exhaust.
Step 11. Reconnect the Dryer
After cleaning, the exhaust must be reassembled using approved connections. The transition duct should remain free from crushing or sharp bends when the appliance is returned to its normal position. Connections should not contain fasteners that protrude significantly into the exhaust and collect lint.
For gas appliances, the fuel connection must be restored and checked appropriately if it was disturbed. The dryer should not be operated until both the appliance connection and the exhaust path are safe.
Step 12. Check Dryer Operation and Airflow
The technician restores power and runs the dryer according to its instructions. Outdoor exhaust airflow and damper operation are checked to confirm that the appliance is discharging as intended. Measurements before and after cleaning may help show whether a restriction was reduced.
If the dryer still overheats or takes unusually long to dry ordinary loads, further diagnosis is necessary. The remaining problem may involve a concealed restriction or an appliance component. Repeatedly forcing air into the duct is not a substitute for identifying the cause.
Can You Use a Regular Air Compressor to Clean a Dryer Vent?
A regular air compressor is not automatically suitable for cleaning a dryer vent. Professional pneumatic attachments may require a compatible compressor, but a household blow gun is not equivalent to a dryer-rated cleaning system. Simply inserting a hose and releasing air provides little control over where loosened lint travels.
An unknown blockage creates an additional risk because air can be redirected through weak connections. If the duct separates inside a wall, lint and air may enter concealed spaces instead of reaching the outdoor termination. Increasing the compressor pressure can make that problem worse.
A suitable cleaning setup must consider the duct's condition and the method used to collect lint. Without those controls, a brush and vacuum are usually more appropriate for accessible residential vent cleaning.
Does Compressed Air Work Better Than a Dryer Vent Brush?
Compressed air and mechanical brushing can both remove lint under suitable conditions. The better method depends on the duct route and material. A brush physically contacts the duct wall, while a pneumatic attachment uses moving air to disturb deposits.
| Comparison | Compressed-Air Cleaning | Dryer Vent Brush Cleaning |
|---|---|---|
| Main method | Pneumatic agitation | Mechanical brushing |
| Typical equipment | Compressor and rated attachment | Brush and flexible rods |
| Household suitability | Generally better left to professionals | Often suitable for accessible metal ducts |
| Lint collection | Requires planned collection | Usually combined with vacuum |
| Long concealed routes | Specialized equipment may help | Reach depends on kit |
| Damaged duct connections | Risk of worsening defects | Also requires caution |
| Roof vent inspection | Separate safe access needed | Separate safe access needed |
Neither method repairs crushed ducts or disconnected fittings. Both can be ineffective when a heavy obstruction blocks the passage entirely. Choosing the correct method requires understanding the vent's condition rather than assuming that greater cleaning force produces a better result.
What Are the Risks of Blowing Compressed Air Into a Dryer Vent?
Several risks arise when compressed air is introduced without a suitable collection and inspection setup. The most obvious is uncontrolled lint release. Fine particles can become airborne in the laundry room or accumulate inside concealed spaces when ducts contain weak connections.
Other problems may include:
- Separating a poorly secured duct joint.
- Pushing lint into a deeper obstruction.
- Damaging a fragile transition duct.
- Dislodging an unsuitable exterior hood.
- Creating airborne lint exposure near the cleaning point.
- Causing an unsecured air hose to whip.
- Leaving deposits trapped around an elbow.
- Mistaking discharged lint for proof of complete cleaning.
- Applying pressure beyond tool or duct limits.
- Failing to identify a crushed or structurally damaged section.
These risks are reasons to evaluate the duct before choosing pneumatic cleaning. They are not solved simply by reducing the compressor setting without considering the nozzle and exhaust arrangement. A suitable professional system uses equipment matched to the task and controls where debris is released.
Can Compressed Air Remove Heavy Dryer Vent Blockages?
Compressed air may loosen some lint deposits, but it is not a reliable solution for every heavy blockage. Thick compacted lint and nesting material may prevent a pneumatic attachment from passing through the duct. A collapsed section also cannot be reopened simply by applying air pressure.
When a severe obstruction is present, inspection should identify its location and cause. Mechanical removal or direct access may be needed before airflow can be restored. If the duct is structurally damaged, the affected section may require replacement.
A persistent blockage should not be addressed by repeatedly increasing air pressure. Doing so can damage the system without removing the obstruction. The cleaning method must change when the duct condition requires it.
How Can You Tell if Compressed-Air Cleaning Worked?
A successful cleaning should remove substantial lint deposits and restore normal exhaust airflow. The outdoor damper should move freely, and the dryer should no longer show signs of a restricted vent. However, airflow improvement alone does not prove that every concealed section is free of debris.
Inspection can confirm whether deposits remain around bends or near the termination. A professional may compare measurements taken before and after cleaning. The duct should also remain structurally intact and properly connected.
If drying performance is still poor after the vent is confirmed clear, the appliance may need additional service. A heating or blower problem cannot be corrected by further cleaning of an unobstructed exhaust.
When Should You Call a Professional?
Professional cleaning is appropriate when a dryer vent requires specialized pneumatic equipment or contains a blockage that household tools cannot safely remove. Long concealed routes and roof terminations also benefit from experienced inspection. The technician should be able to explain how loosened lint will be collected and how the passage will be verified.
Do not continue using a dryer that produces a burning smell or repeatedly overheats. If smoke or fire is present, evacuate and contact emergency services. A serious exhaust restriction should be corrected before the appliance returns to normal use.
A professional may also identify improperly installed duct material or damaged connections that need repair. Cleaning alone will not correct those defects. The finished system should be both clear and structurally sound.
How Can You Prevent the Need for Aggressive Dryer Vent Cleaning?
Routine maintenance reduces the amount of lint accumulating inside the exhaust system. A clear lint screen and properly routed duct help the dryer discharge moisture more effectively. Periodic cleaning can also prevent small deposits from becoming compacted obstructions.
Clean the lint screen before or after every load and inspect the accessible transition duct for crushing. Check the exterior termination periodically to confirm that its flap moves freely. Avoid adding screens that can collect fibers near the discharge.
The U.S. Fire Administration recommends cleaning the dryer vent ductwork every year. Homes with heavy laundry use or complicated vent routes may need more frequent attention. Addressing reduced airflow early can prevent the need for more involved blockage removal.
Conclusion
Compressed air can be used to clean some dryer vents when specialized pneumatic equipment and controlled lint collection are available. It is not a substitute for duct inspection or ordinary maintenance. Household compressors and unrestricted blow guns can create damage or disperse lint into unintended spaces. A dryer-specific brush and vacuum are usually more practical for short accessible exhausts. For long or heavily obstructed vents, choose a qualified cleaner who can inspect the full passage and verify the results.